The Making of Decorators to Options API Transpiler
By Gonçalo Marantes / Sunday, April 9, 2023 / 20 mins
#dx #typescript #Vue #tools #compilers

A somewhat detailed explanation of the technical implementation of the Decorators to Options API Transpiler
A brief introduction to the project
By the end of 2023 Vue 2 will reach its End of Life. For that reason, infraspeak's web application project must migrate from Vue 2 to Vue 3. However, the most important obstacle is that Vue 3 doesn’t support Class style components, which is the syntax we've been using. For this reason, the first step for the Vue version upgrade should be to remove Class style components and the vue-property-decorators library and use the Options API for all components.
In order to aid in this migration, the Decorators to Options API Transpiler project started its development back in January 30, with the goal of batch migrating vue single file components (SFC) to a Vue 3 compatible syntax, i.e the Options API syntax. And as a result, deprecating the use of these libraries.
There is however, some community powered libraries which mimic this syntax and developer experience for Vue 3. However, the vue core team is pushing the use of the composition API due to many reasons, including better performance, code reusability, and typescript support.
The plan
The initial project consisted of Proof of Concept, which simply needed to read a Vue SFC using a class syntax, extract its <script> content and generate the corresponding code following the Options API syntax. First thing's first though, the web client project was using Vue version 2.6.11, and needed a desperate update to the latest Vue 2 version - 2.7.14. While were at it, lets also update some packages.
This is a crucial step as with the release of Vue 2.7 we got a lot of cool new features, which will be key in improving our developer experience with the Options API. Such as:
defineComponent()with improved type inference (compared toVue.extend) similar to Vue 3;- The
emitsoption is also supported, but only for type-checking purposes (does not affect runtime behavior) - And much more 🎉
The generated component should cover all functionalities:
| Class-based syntax | Options API Syntax |
|---|---|
@Prop | props |
@Watch | watch |
@Emit | $emit method with emits option will allow us to have type support 🎉 |
@Ref | $ref property only, since expose is only available for Vue 3 😢 |
Data | data function |
Methods | methods |
Lifecycle Hooks | Lifecycle Hooks are pretty much the same |
Mixins | mixins are deprecated in Vue 3, but we'll keep them for now |
Class getters and setters | Computed property declaration |
As we can see from the table above, we're actually getting quite a few new features with this refactor, thanks to Vue 2.7 back porting some of its feature from Vue 3 (with some limitations and caveats).
In addition to these functionalities the generated component should have the same (if not better) type checking at compile time.
The execution
There are probably a lot of ways to do this (some of which may have been better that our approach), but we chose a compiler style approach to solve this issue, which included the following steps:
- Reading the Vue SFC class based typescript
<script>content; - Generating the Abstract Syntax Tree (AST) and Symbol Table for easier manipulation
- Creating a new AST following the Options API syntax with the generated Symbol Table
- Generating the code from the new AST
- Writing this code into a new Vue SFC leaving the
<template>and<style>blocks untouched
Compilers 101
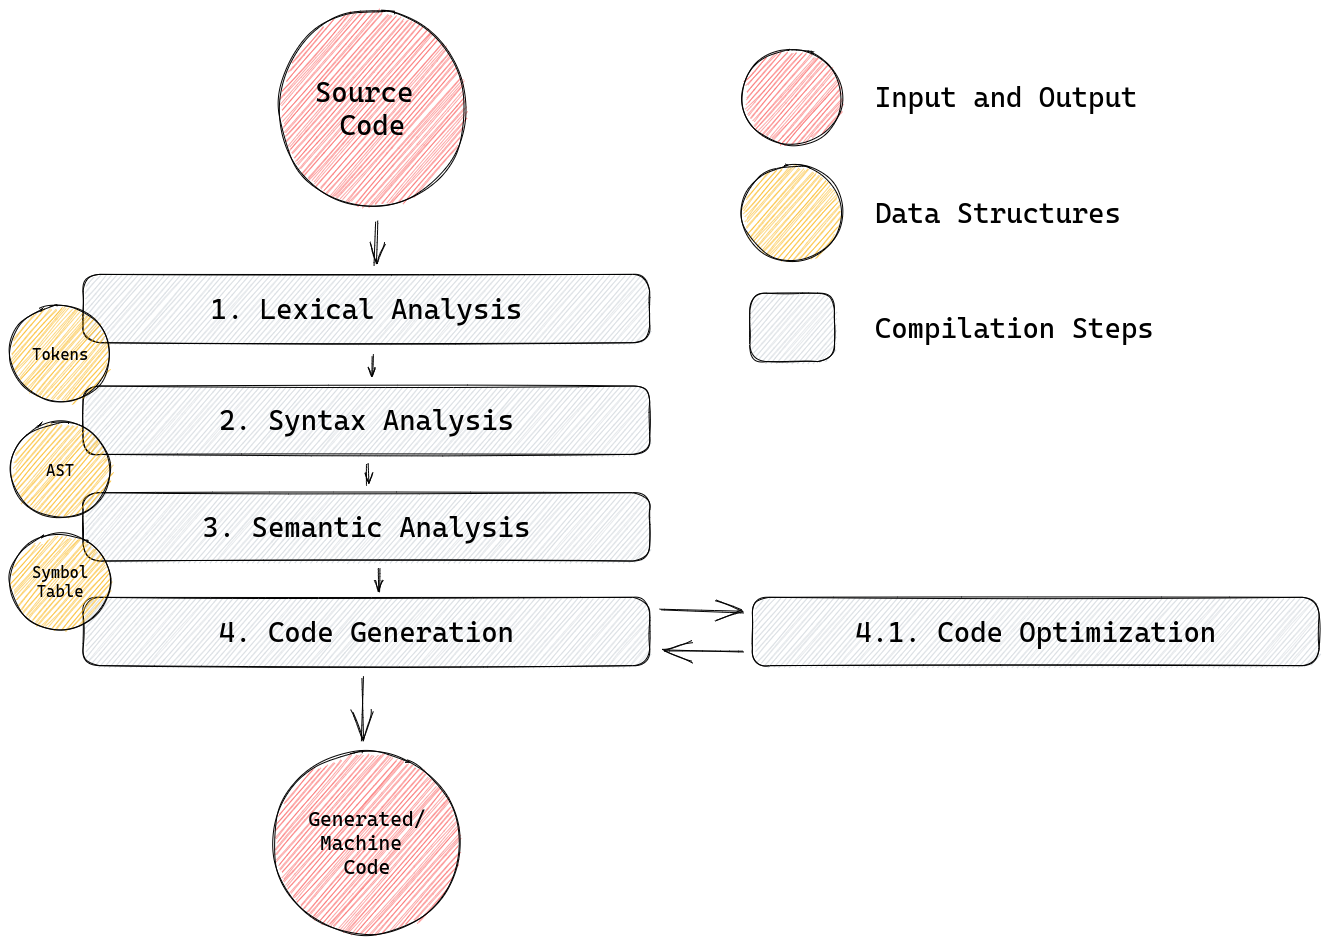
To actually understand what is going on, we'll have to briefly explain what are the generic compilation steps of a general purpose programming language. The diagram bellow should give you an idea, but we'll go over it together.
Lets take the following TypeScript code as an example (as stupid as it may look) for our explanation.
function isEven(num: number): boolean {
    const notUsed = 123
    if (num % 2 === 0) {
        return true
    } else {
        return false
    }
}
Compilation Steps
- Lexical Analysis:
- Analyze tokens in the source code, usually done with the help of regular expressions
- Think of this step as the language's ABCs
- Makes sure there is no unwanted content in the source code, for example: chinese characters (outside a string) in
.tsfile - Produces tokens which feeds into the next step
function isEven(num: number): boolean {
    学中文 // <-- ❌ LEXICAL ERROR: chinese characters are not part of TypeScript's Lexicon
    const notUsed = 123
    if (num % 2 === 0) {
        return true
        🍌 // <-- ❌ LEXICAL ERROR: neither are emojis
    } else {
        return false
    }
}
- Syntax Analysis:
- Analyzes the tokens and their order with each other to make sure that the source code is syntactically correct
- Examples: variable, function and class declarations, conditional statements, etc. So an
ifstatement without()right after is a syntactical error - Produces an AST with feeds into the next step
function isEven(num: number): boolean {
    const notUsed = 123
    if num % 2 === 0 { // <-- ❌ SYNTAX ERROR: expected "(" but got ""
        return true
    } else
        return false
    }
} // <-- ❌ SYNTAX ERROR: extra "}" detected
- Semantic Analysis:
- Analyzes the AST and makes sure that the code "makes sense"
- Example: if a variable or function is used but not declared, there's a semantical error
- Produces a symbol table during the analysis for the next step
function isEven(num: number): boolean {
    const notUsed = 123
    if (num % 2 === 0) {
        return true
    } else {
        return 'false' // <-- ❌ SEMANTIC ERROR: expected type "boolean" but got type "string"
    }
}
- Code Generation:
- Given the AST and Symbol Table we are now able to generate the wanted code for each node
"use strict";
function isEven(num) {
    const notUsed = 123;
    if (num % 2 === 0) {
        return true;
    }
    else {
        return false;
    }
}
- Code Optimization:
- This step is not necessarily done after the code generation, it can be done before or during
- Takes the AST and Symbol Table and optimizes the code
- Example: remove unreachable/dead code, remove's unused declarations (variables, functions, imports, ...), removes unnecessary tokens
"use strict";
function isEven(num) {
    return num % 2 === 0
}
Data Structures
- Tokens:
- A set of tokens that are part of the language's lexicon
- FUNCTION_KEYWORD "function"
- IDENTIFIER "isEven"
- LEFT_PAREN "("
- IDENTIFIER "num"
- COLON ":"
- IDENTIFIER "number"
- RIGHT_PAREN ")"
- LEFT_BRACKET "{"
- ...
-
Abstract Syntax Tree (AST):
- The AST places all these tokens into an hierarchical tree data structure, which makes it possible to understand scopes and logic
- There are algorithms to simplify and detect ways to optimize the AST, but lets keep it simple for now
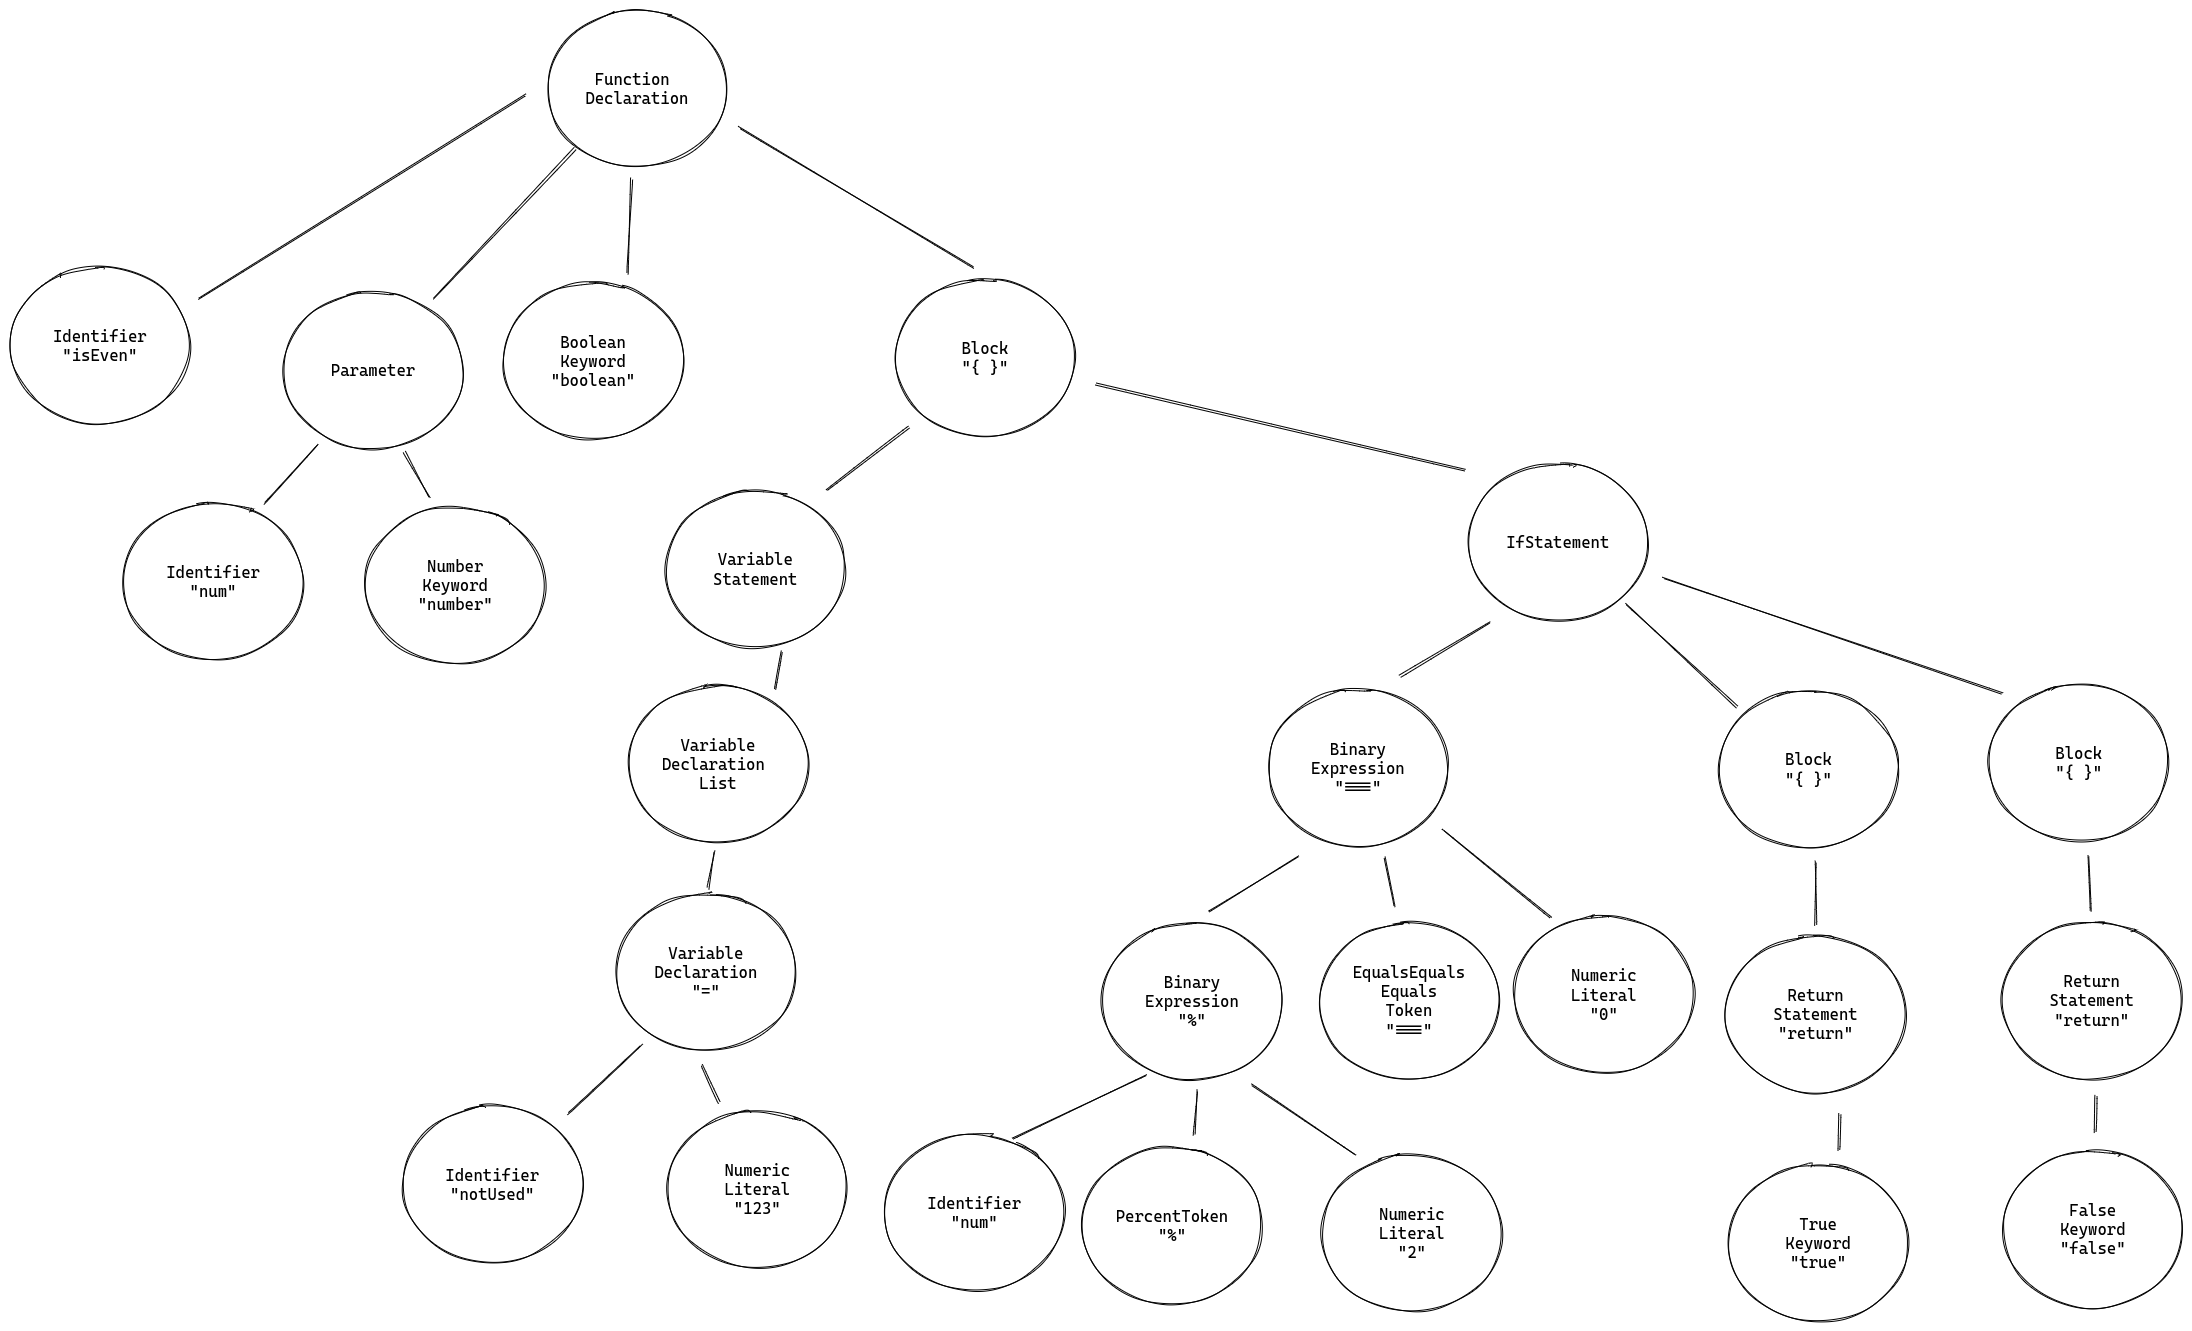
Simplified Abstract Syntax Tree of example code -
Symbol Table:
- Symbol tables are simply data structures which contain information about the declared functions, classes, methods, variables and so on
- Each code block as its owns scope, so its only natural for each block to have its own symbol table. In our code example, we would have symbol tables for:
- the entire file, which would contain
isEvenfunction signature - the
isEvenfunction scope, which would contain thenotUsedvariable declaration - and then one for the
ifblock and another for theelseblock
- the entire file, which would contain
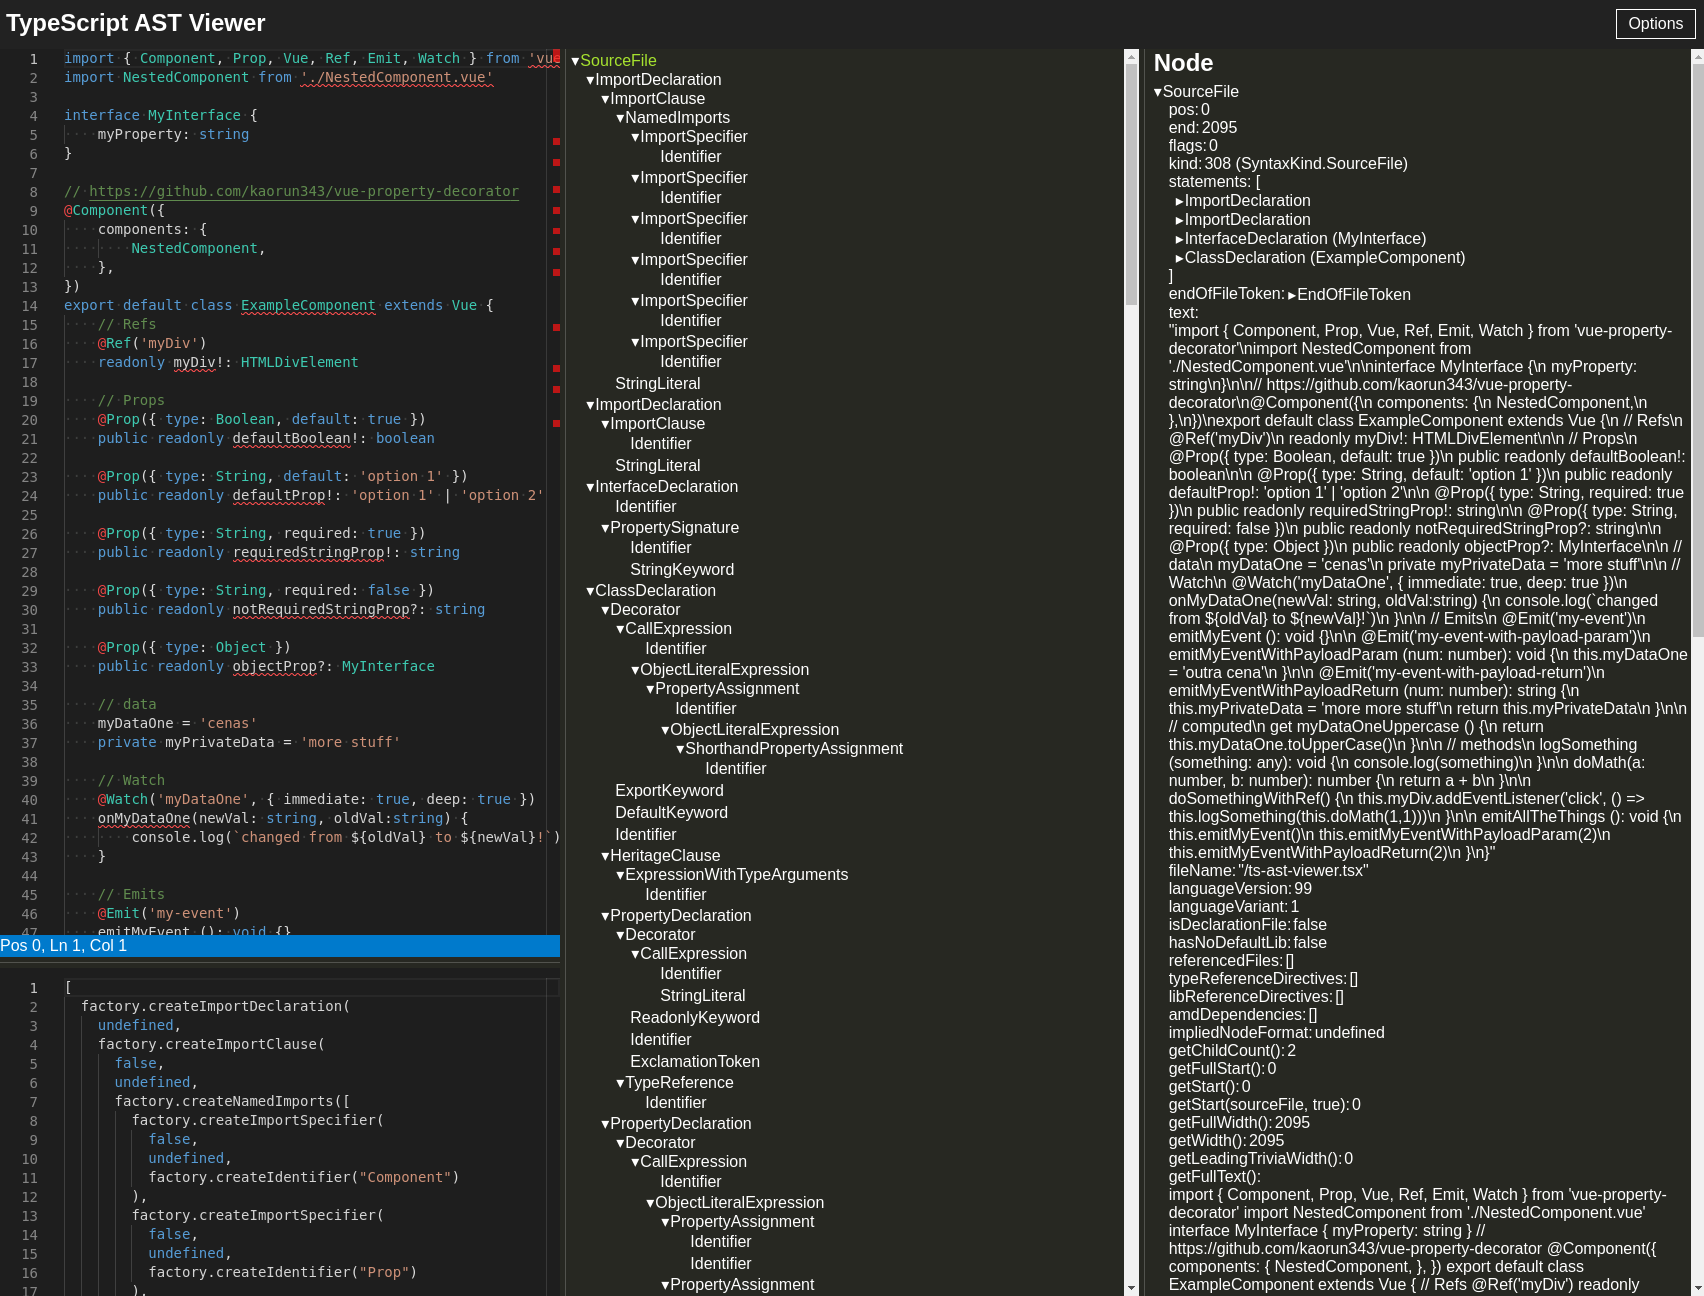
TypeScript AST
In our explanation of the above example, we've already got a glimpse of a very simple typescript AST. Thankfully, there is an online TypeScript AST Viewer which allows us to visualize the tree for user input code. This was a great source of information during the development of the project.
Now let's take a look at an example Vue SFC <script> content using a Class-based syntax with decorators(✨ You can view the same example here ✨)
This may seem a lot to swallow (and it kind of is if this is your first time learning about compilers), but if you take some time, you'll see that it also makes a lot of sense.
Thankfully, we don't have to perform this analysis by hand, as the original TypeScript project allows us to do this ourselves. However, there are some open source packages which build on top of the TypeScript API and already provide some tools for easier compiling. All in all, we've ended up using ts-morph.
If we look back the compilation steps diagram, we've already took care of step 1 and 2. Hurray for us 🎉.
Now let's take a look at which nodes we want to work with, and what they mean in the context of a Vue SFC.
| AST Node(s) | Vue SFC Meaning |
|---|---|
ClassDeclaration with '@Component' Decorator | Component definition with child components |
ClassDeclaration with 'mixin' CallExpression in HeritageClause | Mixin declaration |
PropertyDeclaration with '@Ref' Decorator | Ref declaration |
PropertyDeclaration with '@Prop' Decorator | Prop declaration |
PropertyDeclaration without any Decorator child node | Data declaration |
MethodDeclaration with '@Watch' Decorator | Watch method declaration |
MethodDeclaration with '@Emit' Decorator | Emit method declaration |
GetAccessor | Computed property declaration |
Now, we just need a way to transverse the AST and look for the nodes that match Vue's Component declaration, data, props, methods, etc. Thankfully, there's a design pattern that's perfect for this task.
Visitor Design Pattern to the rescue
The visitor design pattern is a behavioral design pattern which allows us to "visit" an iterable data structure (in this case a tree) and perform some operation when visiting specific types of nodes. Since our project took a more functional style, we've defined our visitors as functions, which have the following type:
/**
 * @param {Node} node AST node to be visited
 * @param {SymbolTable} symbolTable symbol table before visiting the node
 * @returns {SymbolTable} symbol table after visiting the node
 */
export type VisitorFunction = (node: Node, symbolTable: SymbolTable) => SymbolTable
Basically, a visitor function receives a Node and a SymbolTable, and returns another SymbolTable which is basically a copy of the one received as argument with some update given the visited Node. For each AST Node we're looking for, we've implemented a visitor function that returns an updated symbol table, which you can take a look at on the compiler/visitors.ts file.
With this VisitorFunction type we can easily visit the entire tree by reducing our visitors with each Node in our AST and easily build our Symbol Table.
export function buildSymbolTable(sourceFile: SourceFile, visitors: VisitorFunction[]): SymbolTable {
    return visitors.reduce<SymbolTable>(
        (table: SymbolTable, visitor: VisitorFunction): SymbolTable =>
            sourceFile.forEachDescendantAsArray().reduce<SymbolTable>(
                (_table, node) => visitor(node, _table),
                table
            ),
        createEmptySymbolTable()
    )
}
This may look complicated, but stay with me for a while:
visitors.reduce<SymbolTable>([callback], [initial-value])is iterating over our visitors with an initially empty Symbol table, and returns the final filled symbol table;[callback]is a function which basically receives a Symbol Table and the current visitor, returning the symbol table after the visitor finished visiting the tree. It then moves on to the next visitor, with the symbol table in the state the previous visitor left it. It performs the following logic:sourceFile.forEachDescendantAsArray().reduce<SymbolTable>([callback], [initial-value])is iterating over the AST's nodes with a symbol table in some type of state. In the end, it will return a symbol table after each node has been visited;[callback]is a function which receives a Symbol Table and the current AST node, it then visits that node and returns the updated Symbol Table. It then moves on to the next AST Node, with the symbol table in the state the previous node visit left it at;[initial-value]is the current symbol table state after each visitor is done visiting the tree (initially empty);
[initial-value]is an empty Symbol Table;
Welcome to the world of functional programming, simplicity and a little bit of magic, but also some mind fuckery for the unsuspecting. You can learn more about functional programming and its use with TypeScript in my presentation for the December 2022 Engineering Days.
📝 Sidenote: Learn more about SourceFiles here!
Symbol Table
We have yet to define our Symbol Table, let's take a look at that now. Thankfully, we're only interested in the Component Class' symbol table, so we've defined types for each Vue Component property (i.e props, computed, method, etc. Which you can have a look at here) and placed it all together on our symbol table.
Our symbol table is very simple, and only contains a reference to the component we're working with as well as an array for each Vue SFC property. You take a more detailed look here.
export interface SymbolTable {
  component?: Component,
  data: Data[]
  refs: Ref[]
  props: Prop[]
  hooks: Hook[]
  emits: Emit[]
  watch: Watch[]
  methods: Method[]
  getters: Computed[]
  mixins: Mixin[]
}
Code Generation
Now that we have our Symbol Table populated with component data, we can generate whatever code we want. Luckily, ts-morph comes bundled with code-block-writer which already does most of the heavy lifting for us.
So all we have to do is generate the code in the Options API Syntax for each symbol table entry. This part is fairly tedious, but you can take a look at compiler/code-generator.ts if you're interested.
Linting the Generated Code
Even though ts-morph and code-block-writer allow use to write code and format it, there are some specific or even custom code styling rules which are enforced only by ESLint. Each node project (like web-core-client) may have its own rules and instance of ESLint, therefore it was necessary to include these extra formatting rules to avoid as little human intervention as possible.
Thankfully, ESLint provides a NodeJS API, which allows our compiler to run eslint programmatically with a custom .eslintrc.js file and format the generated code in whatever style we want. Take a look at compiler/linter.ts for more details.
Code Optimization
There's not a lot we can do here, as it is out of scope for this project. Nonetheless, since we have access to the AST we could (at least in theory) type methods return types for example.
However, for the time being, not a lot of effort was put into this step.
Running the Compiler as a CLI
Last but not least, we need to make the program run on the command line and accept a user-defined configuration. To make our life's easier, we've just used commander.js to parse and verify CLI options. Options include:
-f: files: (required) accept linux filepaths (globs also accepted) of Vue SFCs to "compile"-l: linter: path to customESLintconfig file-v: verbose: spit what's going on to the console
The result
In the end, we were able to create a compiler/transpiler/thingy which can magically migrate our codebase in a time efficient way, requiring very little human intervention.
All in all, we're really happy with this project and can't wait to see how it affect our migration to Vue 3.
VSCode Task
In order to increase developer experience (and also for the fun of it), there are instructions on the project's README file to install it and configure a task on VSCode to automagically generate Option API Syntax Vue SFC from an opened Class-based Vue SFC.
Limitations
This is all fine and dandy, but real world software usually has a few caveats (especially if 80% of the code developed was done in 4 days), here are the ones I've found so far:
- JSDOC is ignored during AST generation and therefore is lost on the generated component;
- Some of
ESLintstyles might not work at first (not sure why), therefore it is recommended to re-run the linter manually on generated files; - Vue's Options API Syntax has a few caveats regarding type support, so please make sure everything is working before committing your changes;